
Friday, October 8, 2010
ciabatta!
Thursday, October 7, 2010
peanut butter chocolate toffee cookies

I love browsing in the baking goods aisle in my local grocery store. I particularly love looking at all the different kinds of baking chips -- semisweet, bittersweet and milk chocolate chips, white chocolate chips, peanut butter chips, butterscotch chips, cinnamon chips, and on and on. Among my favorites are Heath Toffee Bits. There are two varieties -- Bits O' Brickle, which are just the toffee bits, and Milk Chocolate Toffee Bits, which are pretty much chopped-up Heath Bars. I found this recipe on the back of the bag of the latter. Ordinarily, I prefer not to bake with shortening, but I decided to bake them as written to see how they'd turn out. I was concerned that substituting butter for the shortening would produce cookies with too much spread and that were too thin. And they are pretty thin, even with the shortening. Maybe next time I'll try them with the butter and substitute baking powder for the baking soda (baking soda contributes to spread). One more thing: the recipe cautions to be careful to not overbake the cookies. However, the cookies looked a bit raw at the 8-minute mark so I baked them for another minute or two. Even then, I thought the centers were a bit iffy. I had to cool them on the baking sheet for longer than the recommended 2 minutes as well; they were just too soft and fragile to move at that point.
The verdict on the cookies? Thin and chewy, with crisp edges -- I love how the peanut butter and chocolate toffee bits play against each other. Give them a try!
Heath Bits Peanut Butter Cookies
(from Hershey's Kitchens)
Makes about 3 dozen cookies.
1/2 cup (95g) shortening
3/4 cup (202g) creamy peanut butter
1 1/4 cups (284g) packed light brown sugar
3 tablespoons milk (I used 1%)
1 tablespoon vanilla extract
1 large egg
1 1/2 cups (181g) all-purpose flour
3/4 teaspoon baking soda
3/4 teaspoon salt
1 1/3 cups (8 oz. pkg.) Heath Milk Chocolate Toffee Bits
Preheat oven to 375°F. Beat shortening, peanut butter, brown sugar, milk and vanilla in large bowl until well blended. Add egg; beat just until blended. Combine flour, baking soda and salt; gradually beat into peanut butter mixture. Stir in 1 cup bits; reserve remainder for topping. Drop by heaping teaspoons about 2 inches apart onto ungreased cookie sheet; top each with reserved bits. Bake 7 to 8 minutes or until set. Do not overbake. Cool 2 minutes. Remove to wire rack. Cool completely.
Tuesday, July 6, 2010
fresh pineapple salsa
Alert: this post does not describe any home-baked goods. It's 100 degrees out today, people.

I love that happy serendipity that occurs when you have the impulse to make something and then you discover that you already have all the ingredients you need to make said something. Especially when those ingredients are odds and ends that probably wouldn't have been used in a timely fashion otherwise. Such was the case when I decided I wanted to make pineapple salsa today. I had fresh pineapple, half of a Vidalia onion, a lime I bought some time ago for goodness knows what, and a jalapeno and some cilantro from my garden. And then I found this recipe on the Whole Foods website. I've adapted it slightly, but it's essentially the same. I enjoyed it spooned on to some Blue Ginger Black Sesame and Sea Salt Brown Rice Chips I had in my pantry.
Fresh Pineapple Salsa
(adapted from wholefoodsmarket.com)
Makes about 2 cups.
Toss all ingredients together in a large bowl. Serve immediately or cover and chill until ready to use.

I love that happy serendipity that occurs when you have the impulse to make something and then you discover that you already have all the ingredients you need to make said something. Especially when those ingredients are odds and ends that probably wouldn't have been used in a timely fashion otherwise. Such was the case when I decided I wanted to make pineapple salsa today. I had fresh pineapple, half of a Vidalia onion, a lime I bought some time ago for goodness knows what, and a jalapeno and some cilantro from my garden. And then I found this recipe on the Whole Foods website. I've adapted it slightly, but it's essentially the same. I enjoyed it spooned on to some Blue Ginger Black Sesame and Sea Salt Brown Rice Chips I had in my pantry.
Fresh Pineapple Salsa
(adapted from wholefoodsmarket.com)
Makes about 2 cups.
2 cups diced fresh pineapple
1/4 cup chopped cilantro or to taste
1/4 cup finely chopped sweet onion
1 jalapeno pepper, finely chopped
Juice and zest of 1 lime
Sea salt to taste
1/4 cup chopped cilantro or to taste
1/4 cup finely chopped sweet onion
1 jalapeno pepper, finely chopped
Juice and zest of 1 lime
Sea salt to taste
Monday, July 5, 2010
revisiting an old favorite

Last summer I discovered a new favorite -- grilling flatbreads. They are quick and simple to make, and so much fun, and everyone loves to eat them. Yesterday, I made Grilled Asiago Rounds and Zucchini Caponata from King Arthur Flour's Bakers' Banter. Both recipes are so easy and sooooo good. Check out the links above for the recipes as well as how-to videos.
I was outside grilling the breads yesterday morning so we could take them along with us into Boston for the fireworks. L. said he could smell them in his sleep. The last time I made this I thought it lasted a bit longer -- maybe a couple of days, but the only reason we didn't finish it all last night was because I only brought two-thirds of the batch of flatbreads and caponata with us. We had other goodies as well, and really, who needs that much food for just one evening? I took a lot of abuse for that decision. Rest assured, we finished the rest of it today.

Saturday, July 3, 2010
happy fourth of july!

I made these for a cookout this weekend. I glazed them with white icing and then dotted the cookies while the icing was still wet with red- and blue-tinted icings. Then I used a toothpick to swirl the colors around. The results were pretty cool-looking -- they reminded me of the trails of color that fireworks leave in the sky as they die out.
The cookies themselves were from the Holiday Cookies recipe from The America's Test Kitchen Family Baking Book. WPR.org posted the recipe here so I won't repost it, but it's one I've used before. I love it because it's easy to work with and the cookies are soft and have great flavor. The icing is the shiny cookie glaze from The King Arthur Flour Baker's Companion Cookbook.
King Arthur Flour's Shiny Cookie Glaze
(reposted from Serious Eats, with my adaptations)
3 1/2 cups (14 oz.) confectioners' sugar, sifted
6 tbs. (3 oz.) milk
1/4 cup (about 1.25 oz.) meringue powder
1 tsp. clear vanilla extract
Wilton icing colors
Place the sifted confectioners' sugar and meringue powder in a medium-sized bowl. Add the milk and vanilla to the sugar and meringue powder and mix on low for 4 to 5 minutes, until the glaze is the consistency of molasses. Adjust the consistency with a tablespoon of water if necessary. Add icing color if desired. Important: keep the glaze covered while working with it to keep it from forming a skin or hardening up.
Use the spoon for apply the glaze to the cookies and spread using the back of the spoon, removing any excess. Place on a drying rack to let the excess glaze drip off and let the glaze harden and dry for several hours or overnight.
 And here are some from the "let's get rid of the rest of the dough and the icing" batch. They were decorated a bit differently!
Thursday, July 1, 2010
english muffins, hitz-style
 I recently finished my first year in the Baking and Pastry Arts program at Johnson and Wales University. Many of the formulas we used in my breads and Viennoiserie classes came from Ciril Hitz's books, Baking Artisan Bread and Baking Artisan Pastries and Breads. Chef Hitz is our department chair at JWU and occasionally teaches in the weekend program (in which I am enrolled). So far, my interactions with him have been limited to relaying messages from him or hitting him up for equipment and/or supplies, including one occasion in which I narrowly missed (by inches!) whacking him in the face with a transfer peel. So unless he's forgotten or he's extremely forgiving, I'm actually pretty happy I haven't had him for an instructor yet. Come to think of it, I'm pretty sure we all look the same in uniform anyway, so it probably doesn't matter.
This English Muffin formula is from Baking Artisan Pastries and Breads. It's different from my previous attempt in that these muffins are baked rather than cooked on the stovetop. The batter is scooped into the muffin rings and proofs on a sheet pan for an hour before they're baked. Unfortunately, I only have four rings, which isn't a problem when you're cooking them the other way because you can only fit four rings in a pan anyway, but it is an issue when you have to proof a dozen at once. I ended up using the four rings, plus the four largest circle cutters from my school knife kit. I know: 4 rings + 4 circle cutters = 8 muffins, not 12. This was not apparent to me even though I was overfilling the molds because I had extra batter. There's a reason all the math I do involves a calculator; I clearly can't even count. At any rate, no serious harm was done, as they turned out fine.
We really enjoyed the chewiness from the multigrain soaker that was added to the batter. Chef Hitz suggests using a packaged seven-grain mixture, but I made my own three-grain combination -- oats, flax seeds and wheat bran -- basically what I could scrounge up from my freezer stash. There's also some white whole wheat flour in the batter for additional nutritional oomph. The crumb wasn't as filled with nooks and crannies as a store-bought muffin, but this might be due to my improvisational molding (and overfilling). I didn't hear anyone complain though!
Wednesday, June 30, 2010
happy bday, pj!
 My first post post-school year! This was a little something that I baked for my darling husband's 45th birthday a week ago. The cake was Hershey's "Perfectly Chocolate" Chocolate Cake with Philadelphia Cream Cheese Frosting. The icing job came out looking a little rough but it was sweltering that day and I had to chill the cake for 15 minutes for every 2 minutes of work I got done because otherwise the icing was turning to soup. By now, I've had plenty of experience working in hot kitchens, but since it was for just us, I didn't sweat it too much. I would've liked to make the sides a bit smoother before combing them though.
Hershey's "Perfectly Chocolate" Chocolate Cake
(from Hershey.com)
About 10-12 servings.
2 cups sugar
1-3/4 cups all-purpose flour
3/4 cup Hershey's Cocoa, sifted
1-1/2 tsp. baking powder
1-1/2 tsp. baking soda
1 tsp. salt
2 eggs
1 cup milk
1/2 cup vegetable oil
2 tsp. vanilla extract
1 cup boiling water
Heat oven to 350°F. Grease and flour two 9-inch round baking pans.
Stir together sugar, flour, cocoa, baking powder, baking soda and salt in large bowl. Add eggs, milk, oil and vanilla; beat on medium speed of mixer 2 minutes. Stir in boiling water (batter will be thin). Pour batter into prepared pans.
Bake 30 to 35 minutes or until wooden pick inserted in center comes out clean. Cool 10 minutes; remove from pans to wire racks.
Philadelphia Cream Cheese Frosting
(from Kraftrecipes.com)
Kraft says this is enough to ice two 8- or 9-inch layers; I made 1 1/2 times the recipe to be safe and it was barely enough.
1 8-oz. pkg. Philadelphia Cream Cheese, softened
1/4 cup (1/2 stick) butter, softened
1 tsp. vanilla extract
1 16-oz. pkg. powdered sugar (about 4 cups), sifted
Beat cream cheese, butter and vanilla in large bowl with electric mixer on medium speed until well blended. Add sugar gradually, beating until well blended after each addition.
About 10-12 servings.
2 cups sugar
1-3/4 cups all-purpose flour
3/4 cup Hershey's Cocoa, sifted
1-1/2 tsp. baking powder
1-1/2 tsp. baking soda
1 tsp. salt
2 eggs
1 cup milk
1/2 cup vegetable oil
2 tsp. vanilla extract
1 cup boiling water
Heat oven to 350°F. Grease and flour two 9-inch round baking pans.
Stir together sugar, flour, cocoa, baking powder, baking soda and salt in large bowl. Add eggs, milk, oil and vanilla; beat on medium speed of mixer 2 minutes. Stir in boiling water (batter will be thin). Pour batter into prepared pans.
Bake 30 to 35 minutes or until wooden pick inserted in center comes out clean. Cool 10 minutes; remove from pans to wire racks.
Philadelphia Cream Cheese Frosting
(from Kraftrecipes.com)
Kraft says this is enough to ice two 8- or 9-inch layers; I made 1 1/2 times the recipe to be safe and it was barely enough.
1 8-oz. pkg. Philadelphia Cream Cheese, softened
1/4 cup (1/2 stick) butter, softened
1 tsp. vanilla extract
1 16-oz. pkg. powdered sugar (about 4 cups), sifted
Friday, May 7, 2010
soft dinner rolls

I'm currently finishing up my next to last class for the school year -- Principles of Artisan Bread Baking. It's the first year class that I had been waiting for all year, and while it's been fun and thoroughly educational, it's also so well within my comfort zone that I haven't felt terribly challenged. Perhaps it's a mental thing -- I'm simply not petrified of failing in this class. However, there's one thing that has me completely stymied: "braiding" dinner rolls. I put that in quotations because it's not really a braid -- it's made from a single strand of dough -- but it's twisted to look like a braid. I've been over it many times and had Chef and more adept classmates show me the technique again and again and I'm confident I'm doing it the same way they are.... it's just that the final product doesn't look quite right to me.
My practical is this Sunday and I know the dinner rolls are one of the products I will be graded on. I have to make a total of three shapes -- the braid, a twist and a dog bone (sort of like a double twist). I'm not concerned about the last two. I made rolls today and practiced the braid. About halfway through the dough I think I may have had a breakthrough but then again, I'm not sure. We'll see on Sunday.
Wednesday, March 3, 2010
classic french bread
 Even though I've haven't been posting regularly lately, I do still bake (recreationally speaking) very regularly. My hard drive is chock full of photos of baked goods, but I can't find the time to blog any of it. However, JWU will be out for the summer in 12 short weeks and rest assured, I plan to resume my regular posting.
 One of the things I've been making regularly at home has been bread. My go-to bread lately is the Classic French Bread from Peter Reinhart's most excellent Artisan Breads Every Day (and I'm not just saying that because he thanks me -- and over 500 other people -- on page 215) -- it's just a straightforward, tasty, really consistent recipe. What I love most about it is that with a little bit of planning and very little fuss, we can have quality bread with dinner. Peter's method in this book is to mix the dough the day (or a few days) before you intend to bake. You then refrigerate the dough overnight (or up to 4 days). While the dough is in the fridge, the flavor develops and deepens. On baking day, you shape the loaves, then proof and bake. It really produces some of the best bread we've ever eaten.
Monday, February 22, 2010
chocolates
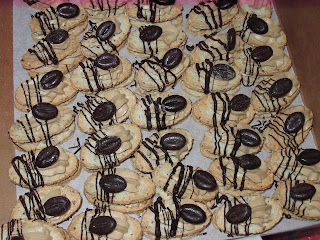
 I'm currently in the midst of Chocolates and Confections class at school. The class is really more like part chocolates - part really hard science class (at least for me). At any rate, above is a picture of some of what I made yesterday. On the top are peanut butter pralines (with rice krispies for crunch), painstakingly hand-dipped in lovingly table tempered milk chocolate. Arranged on the bottom of the sheet pan are mocha ganache-filled pralines, dipped in milk chocolate and garnished with cocoa nibs. We also made a raspberry ganache that we will cut and dip next Sunday. By the end of the (very long) day, we were all chocolate-covered! Thank goodness for Oxyclean.
Tuesday, February 2, 2010
scali rolls

I made these the other day when I needed something bready to go with the chicken chili I was making. The recipe is from Bakers' Banter, and looked like something I've made a number of times before. Unfortunately, as it so often happens these days, I didn't manage my time very wisely and when it came time to braid and divide the dough, I was scrambling. I haven't braided dough lately and couldn't quite remember how best to go about it and then I kind of hacked the braided loaves into irregular lengths. Oh well. They were still tasty.
Saturday, January 30, 2010
gingersnaps

I have a tremendous soft spot for all things ginger, but I particularly love ginger cookies. My favorite ginger cookie is the double ginger cookie that we bake for our church's Holiday Fair. They are a little plump (not much spread, but good rise) and are half-dipped in white chocolate. The combo is heavenly. But I don't have that recipe.
I had a hankering for ginger cookies the other day and perused my cookbooks for something that would fill my craving. I found a recipe for Gingersnaps in my old stand-by -- The Fannie Farmer Cookbook. I had some misgivings about the recipe, namely that it contained shortening, but in the end, I couldn't taste it at all. The cookies were chewy and pleasantly gingery... everything I was looking for. And even P. (who doesn't share my ginger cookie fixation) enjoyed them immensely.
Wednesday, January 6, 2010
whoops! an omission
I forgot to call out the brownies in the first photo in the last post. They are on the left, below the Raspberry Wreaths and above the Harlequins. The brownies themselves were actually from a King Arthur Flour recipe and we glazed them with chocolate ganache (not part of the original recipe).
another practical is upon me
I'm wrapping up the first segment of my second trimester next Sunday -- Cookies and Petit Fours. I'm shocked to find that I will soon have four Baking and Pastry classes under my belt; it seems like such a short time ago when I was so overwhelmed and crazy from the pace of the classes. Now it seems (mostly) like old hat.
Below are a few of the items we made during this segment.
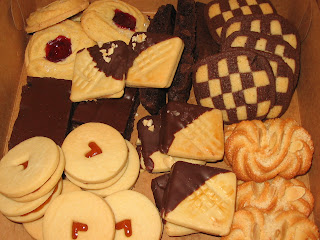
Clockwise from top left: Raspberry Wreaths, Chocolate Biscotti, Checkerboard Cookies, Almond Spritz, Arachides, and Harlequins.
The Raspberry Wreaths have a layer of short dough on the bottom, with butter spritz dough and a raspberry jam filling on top. Chocolate Biscotti have chocolate chips in the cocoa-flavored dough. The Checkerboard Cookies are made with vanilla and chocolate shortbread. The Almond Spritz contain almond flour and are garnished with a sprinkle of almond flour and slivered almonds. The Arachides are filled with a mixture of Pralinosa (a hazelnut-flavored paste) and peanut butter and are dipped in ganache and sprinkled with toasted peanuts to finish. The Harlequins are made from short dough and are filled with orange jam.
Above are another Petit Fours -- Japonaise Mochas. They are tiny Japonaise wafers sandwiched with a layer of a mocha-flavored Swiss Buttercream and are finished with a little more buttercream on top, a drizzle of chocolate and a mocha coffeebean. These were P.'s favorites!
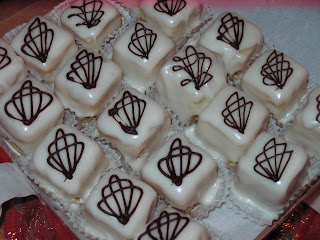
And last are the Petit Fours Glacé. Two layers of frangipane, spread with thin layers of orange jam and topped with a thin layer of marzipan. The whole thing is glazed with a layer of poured fondant and decorated with a chocolate filigree. The sugar in these makes my heart race!
Below are a few of the items we made during this segment.
Clockwise from top left: Raspberry Wreaths, Chocolate Biscotti, Checkerboard Cookies, Almond Spritz, Arachides, and Harlequins.
The Raspberry Wreaths have a layer of short dough on the bottom, with butter spritz dough and a raspberry jam filling on top. Chocolate Biscotti have chocolate chips in the cocoa-flavored dough. The Checkerboard Cookies are made with vanilla and chocolate shortbread. The Almond Spritz contain almond flour and are garnished with a sprinkle of almond flour and slivered almonds. The Arachides are filled with a mixture of Pralinosa (a hazelnut-flavored paste) and peanut butter and are dipped in ganache and sprinkled with toasted peanuts to finish. The Harlequins are made from short dough and are filled with orange jam.
Above are another Petit Fours -- Japonaise Mochas. They are tiny Japonaise wafers sandwiched with a layer of a mocha-flavored Swiss Buttercream and are finished with a little more buttercream on top, a drizzle of chocolate and a mocha coffeebean. These were P.'s favorites!
And last are the Petit Fours Glacé. Two layers of frangipane, spread with thin layers of orange jam and topped with a thin layer of marzipan. The whole thing is glazed with a layer of poured fondant and decorated with a chocolate filigree. The sugar in these makes my heart race!
Subscribe to:
Posts (Atom)